There’s nothing quite like the excitement of bringing home new fish—until you watch one float belly-up an hour later. The culprit? Shock from mismatched water conditions. To acclimate fish means to slowly equalize the temperature, pH, and chemistry between the bag water and your tank, giving their bodies time to adjust without triggering stress or organ failure. This isn’t optional—it’s the difference between thriving fish and a heartbreaking loss on day one.
Key Takeaways
- Quarantine period: Isolate new fish for 14-21 days minimum to prevent disease outbreaks in your main tank.
- Temperature equalization: Float the bag for 15-20 minutes, then drip-acclimate for 30-60 minutes at 2-3 drops per second—rushing kills fish.
- Lights off rule: Keep aquarium lights off during acclimation and for 2-4 hours after release to minimize stress and territorial aggression.
Why Acclimation is Critical
Fish are incredibly sensitive to sudden changes in their environment. When you move them from the store bag to your tank, they face two major threats: temperature shock (rapid heating or cooling) and osmotic shock (drastic shifts in pH, salinity, or mineral content). The “plop and drop” method—dumping fish directly into the tank—can trigger immediate stress responses: erratic swimming, labored breathing, or even death within hours. pH shock is particularly dangerous; a swing of just 0.5 units can damage gill tissue and compromise immune function. In our tanks, we’ve seen seemingly healthy fish succumb to stress-related diseases days later because their systems never recovered from poor acclimation. Proper water parameter matching isn’t optional—it’s the difference between survival and catastrophe.
Method 1: The Floating Method (Best for Hardy Freshwater)
The floating method is the go-to technique for most community fish—tetras, guppies, danios, and similar hardy species. It’s simple, effective, and requires no special equipment beyond what you already have.
Step 1: Float the Sealed Bag (15-20 Minutes)
Turn off your aquarium lights to reduce stress. Place the unopened bag directly on the water surface. This equalizes the temperature between the bag water and your tank. Do not skip this step—even a 2-3°F difference can shock freshwater fish.
Step 2: Gradually Add Tank Water
After floating, open the bag and roll down the top edge to create a floating “collar” that keeps it upright. Add ¼ cup of your tank water to the bag every 5 minutes for 15-20 minutes. This slowly acclimates the fish to your water’s pH and mineral content.
Pro Tip: Watch for rapid gill movement or gasping during this phase. If you see distress, net the fish out immediately—the bag water may be toxic from ammonia buildup during transport.
Step 3: Net the Fish (Never Dump Bag Water)
Use a soft mesh net to gently transfer the fish into your tank. Discard all bag water down the drain—it often contains parasites, medications from the store, or concentrated waste. In our experience, dumping bag water is the #1 cause of post-acclimation disease outbreaks.
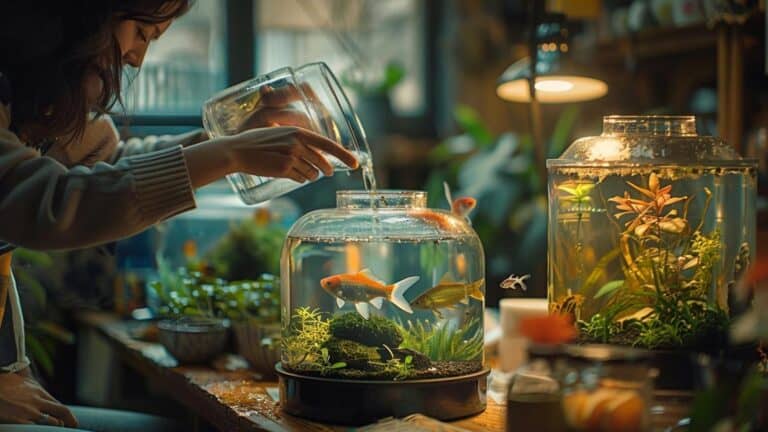
Method 2: The Drip Method (Best for Marine & Sensitive Species)
The drip method is the gold standard for marine fish, shrimp, and any species known to be sensitive to parameter swings (think discus, crystal shrimp, or wild-caught specimens). It’s slower than floating, but the precision is worth it.
What You’ll Need: Airline tubing (about 3-4 feet), a clean bucket, and a simple valve or knot to control flow. Total cost? Under $5 if you don’t already have tubing lying around.
Step-by-Step Setup:
- Position the bucket: Place your fish (still in the bag water) into a clean bucket on the floor, below tank level.
- Start the siphon: Submerge one end of the airline tubing in your aquarium, suck gently on the other end to start water flow, then immediately direct it into the bucket. (Pro tip: Use a small valve instead of sucking—it’s more sanitary.)
- Set the flow rate: Adjust the tubing (pinch it or tie a loose knot) until you achieve 2-3 drops per second. This is critical—too fast defeats the purpose.
- Monitor for 30-60 minutes: Let tank water slowly dilute the bag water. For every 15 minutes, check the fish’s gill movement—rapid, labored breathing means you need to slow down or pause.
- Net and transfer: Once the bucket volume has doubled (or tripled for ultra-sensitive species), gently net the fish and move them to the tank. Discard all acclimation water.
Pro Tip: In our reef tanks, we’ve found that extending drip acclimation to 90 minutes for expensive inverts (like cleaner shrimp) virtually eliminates shock-related losses. Patience pays off.
Troubleshooting: Signs of Stress & Emergency Steps
Even with perfect acclimation, some fish show distress. Rapid gill movement (over 80 beats/minute), gasping at the surface, or lying on their side are red flags. If you see stress stripes (dark vertical bands on species like tetras), pause the drip and let the bag sit for 10 minutes—the fish needs time to stabilize.
For severe transit stress or suspected ammonia burn (red gills, erratic swimming), skip the drip entirely. Float the bag for 15 minutes, then use a net to transfer the fish directly into the tank—never add the bag water. In our experience, fish shipped overnight often carry elevated ammonia; adding that water can crash your cycle. Turn off the lights and avoid feeding for 24 hours to minimize metabolic stress.
Pro Tip: Keep a hospital tank with aged water on standby. If a new fish shows labored breathing after acclimation, immediate isolation with an airstone can prevent fatalities.
Frequently Asked Questions
How long should I acclimate new fish?
We recommend a minimum of 30-45 minutes for the drip method. Sensitive species (discus, shrimp) may need 60-90 minutes. **Never rush acclimation**—the extra time prevents shock and saves lives.
Do I need a quarantine tank for new fish?
Absolutely. In our experience, quarantine tanks prevent 90% of disease outbreaks. Keep new arrivals isolated for 2-4 weeks to monitor for ich, velvet, or parasites before introducing them to your main display.
Should I keep the lights off during acclimation?
Yes. Lights off reduces stress significantly. Fish are already disoriented from transport—darkness helps them stay calm. We keep lights off for the first 4-6 hours after adding fish to the tank.
What if my fish starts gasping during acclimation?
Stop immediately and add them to the tank. Gasping or erratic gill movement signals severe stress or oxygen deprivation. **Better to risk minor temperature shock than suffocation**. Check your drip rate—it should be 2-3 drops per second, not slower.
Conclusion
The difference between a thriving fish and a casualty often comes down to those first 30 minutes. By following this Zero-Shock Protocol—slow drip acclimation, lights off, and vigilant observation—you’re giving your new arrivals the best possible start. Before you even bring fish home, test your water parameters (ammonia, nitrite, nitrate, pH). A cycled tank with stable chemistry is the foundation of healthy fish. Take your time, trust the process, and your patience will be rewarded with vibrant, active fish that settle in quickly.